
One fundamental is the concept in programming is the function. Functions are self contained code that can be run from anywhere.
Unreal Engine 5 blueprints also have functions that you can use to separate your nodes inside the blueprint editor.
In this guide we will be showing you how to get started with Blueprint Functions in Unreal Engine 5!
What is a Function?
Blueprint Functions are self-contained pieces of logic that you can create once and run from multiple places in your Blueprints. They allow input and output parameters for flexibility.
For example, instead of writing the same logic to calculate damage multiple times, you can create a function called CalculateDamage, call it wherever needed, and update it in one place if changes are required.
Note that a function is created for a specific blueprint actor and can only be used
In this guide we are going to start right from the beginning and create a simple function to help you understand this concept. We then expand upon this and show you more features that functions can have!
Creating a Function
To start, we are going to make a simple function that prints a string to the screen.
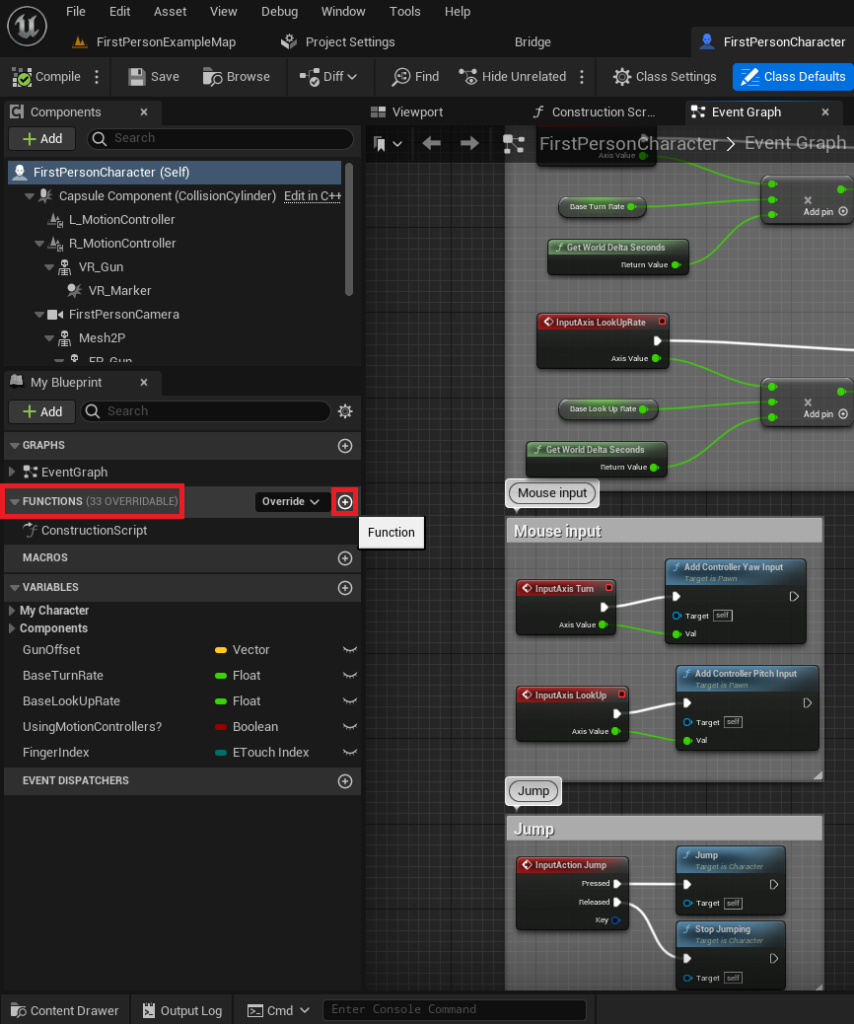
Firstly we need to open the blueprint actor that we want to add the function to. In this example we are using the FirstPersonCharacter blueprint from the First Person Shooter template provided by Unreal Engine.
As you can see in the image below, on the left side of the editor window, there is a drop down section named “Functions”. This section is where all of our functions live for this specific blueprint.
We can create a new function by clicking the circle with a plus symbol on the right side of the functions drop down as shown in the image below.
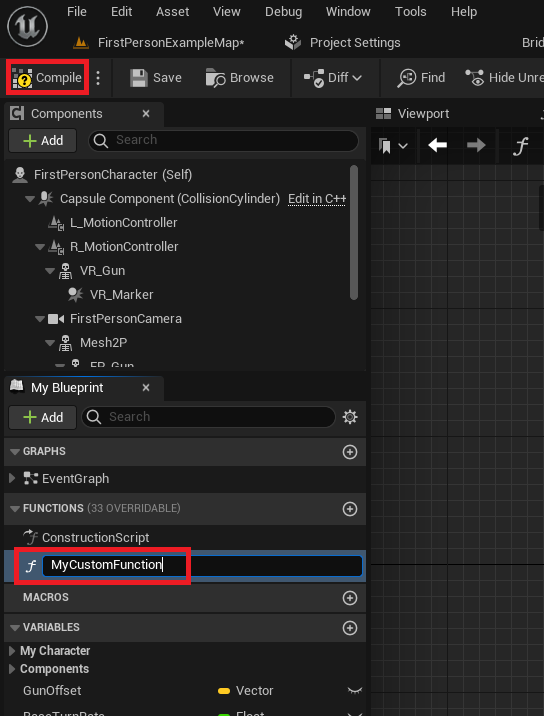
Next, we can then give our function a name. It is advised to give our functions readable and clear names to keep our project clean.
Messy names that are confusing make developing a large project difficult so it is best to keep this in mind.
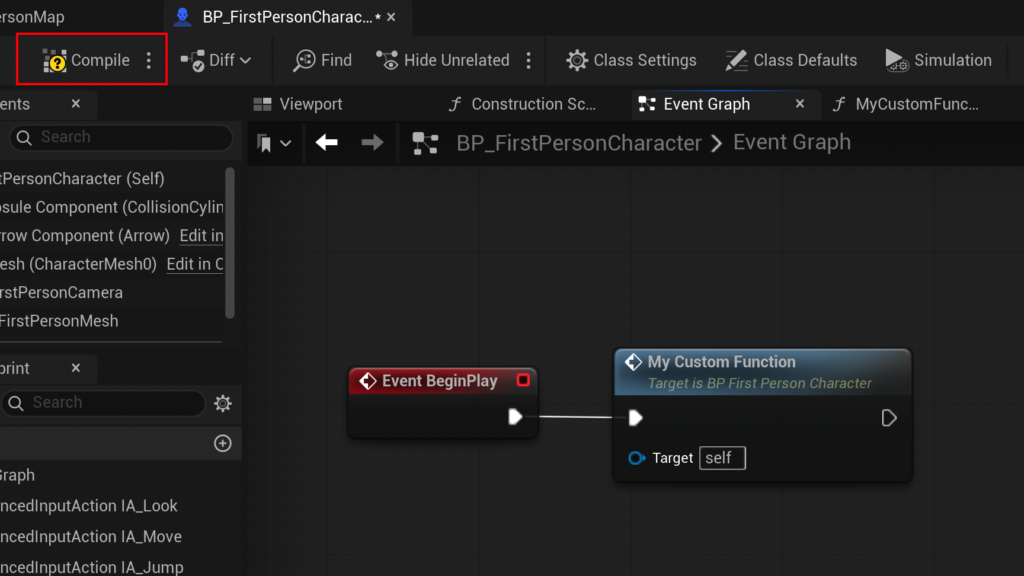
Once the function is named either press enter, or click anywhere in the blueprint window, then click the “Compile” button as indicated in the image. This then creates our function and compiles it into the blueprint so we can start using it in our project.
Adding Basic Functionality
Now that we have our new function created and compiled, we can see it doesn’t do anything at the moment. We need to add some simple functionality!
In this first example we are printing a string to the screen. To achieve this we need to add that node to our function.
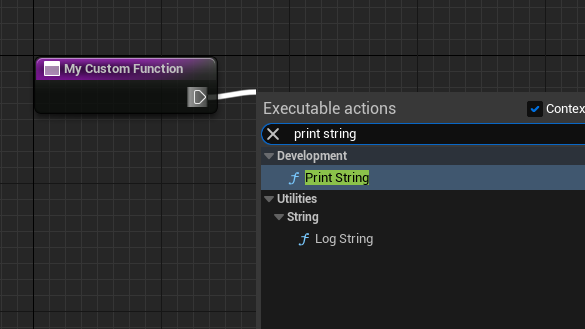
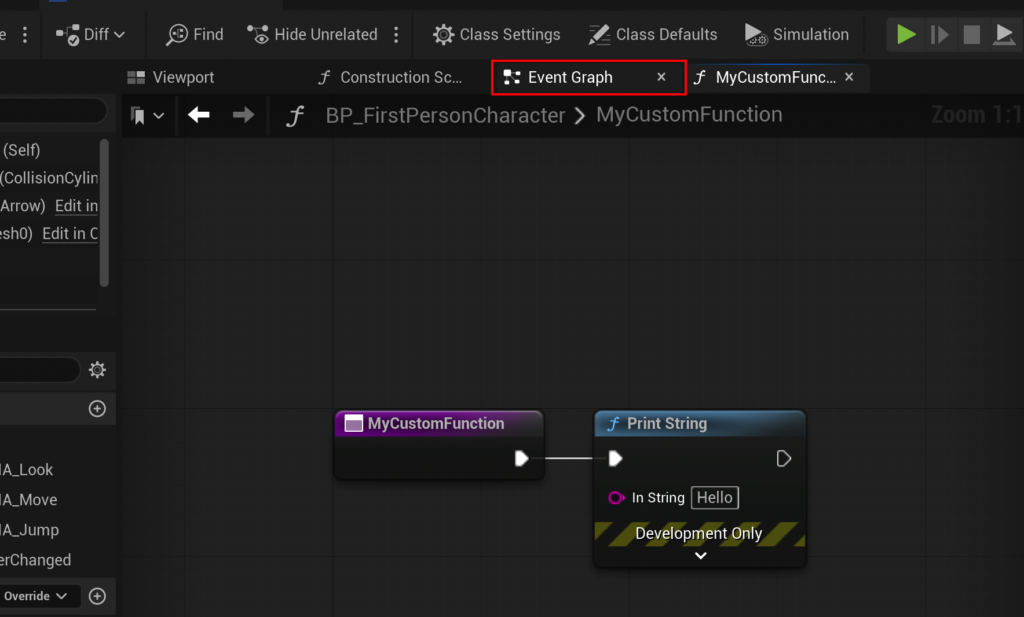
First, click and drag from the white sidewards triangle on our “My Custom Function” node. This is called an exec pin and allows us to add pieces of code together to run one after another (sequentially).
Once we click and drag then let go of the click, anywhere on the grey background grid, we then are greeted with a popup menu showing all of the blueprint nodes (these are functions!) we can add to our own function.
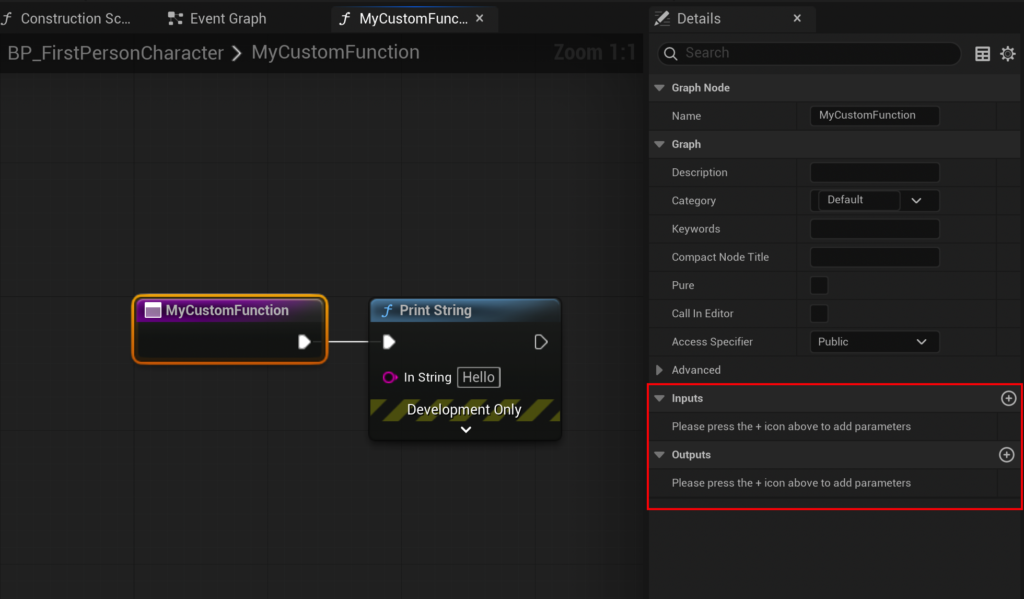
Click “Print String” in the menu, this creates the “Print String” node in our function graph.
As we dragged from the white exec pin, our Print String node is automatically connected to our MyCustomFunction as shown in the image below.
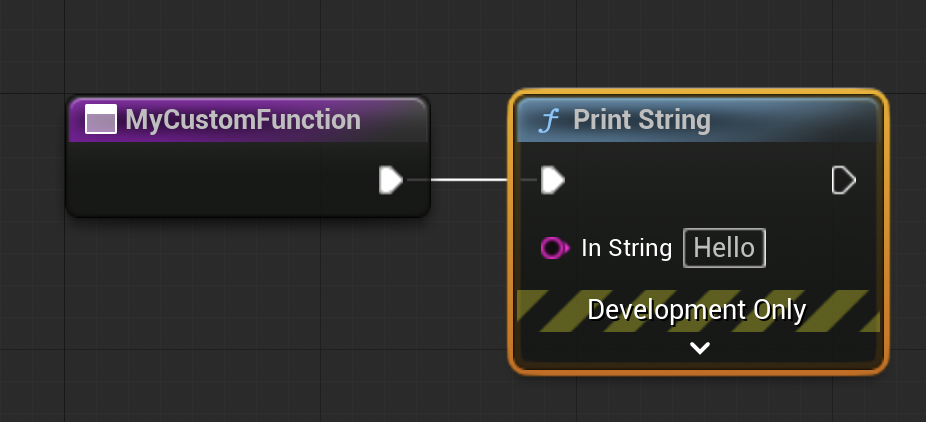
When our “My Custom Function” runs, it will now run the Print String node that is connected to it!
You may also see people talking about “call”, “called”, or “calling” functions. This is the same as running a function!
Testing our Print String
Now that our function is setup to print a string to the output log we need to run our function. The easiest way is to run our function on Begin Play!
Begin play is an “Event”. An event is similar to a function but cannot return values and can run a few special asynchronous nodes that functions cannot.
Begin Play is an event that is called when the actor is spawned into the game world. As our FirstPersonCharacter already is in the game world, this Begin Play event runs code when the game starts.
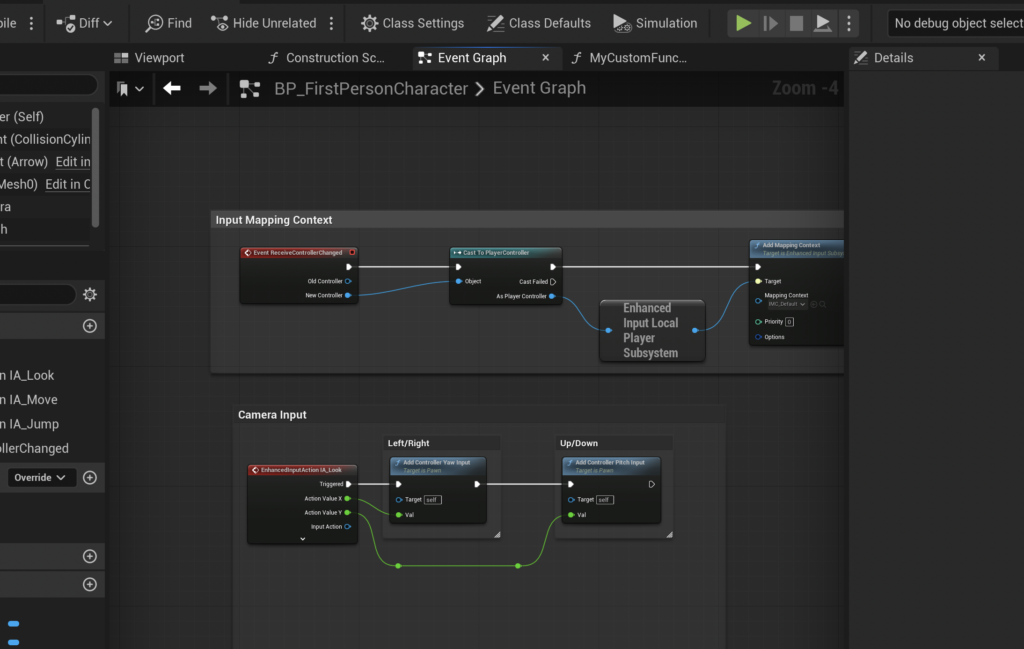
We first want to click the Event Graph button at the top of the blueprint editor.
Now our main blueprint event graph will appear again on the screen.
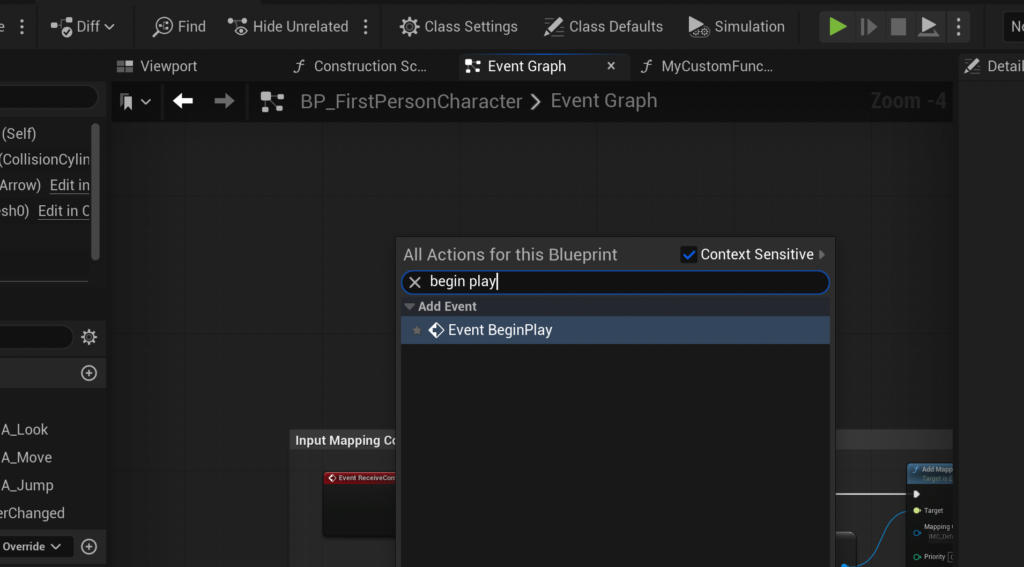
Find somewhere free and right click. In the box that appears search for Event Begin Play and click it to create the event.
Unreal Engine will automatically run the Begin Play event as described in the previous section so no setup is required.
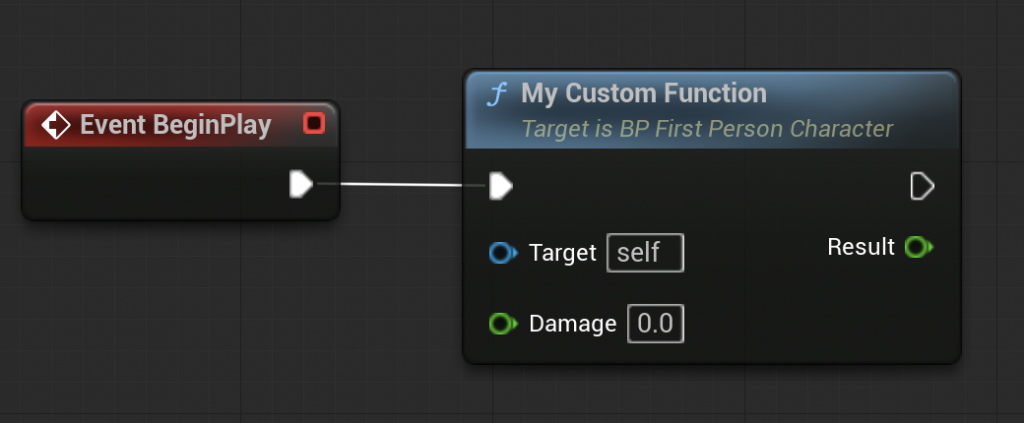
Like before, drag from the white exec pin and let go of the mouse click in the grid. In the pop up menu, search for our MyCustomFunction and click it in the list.
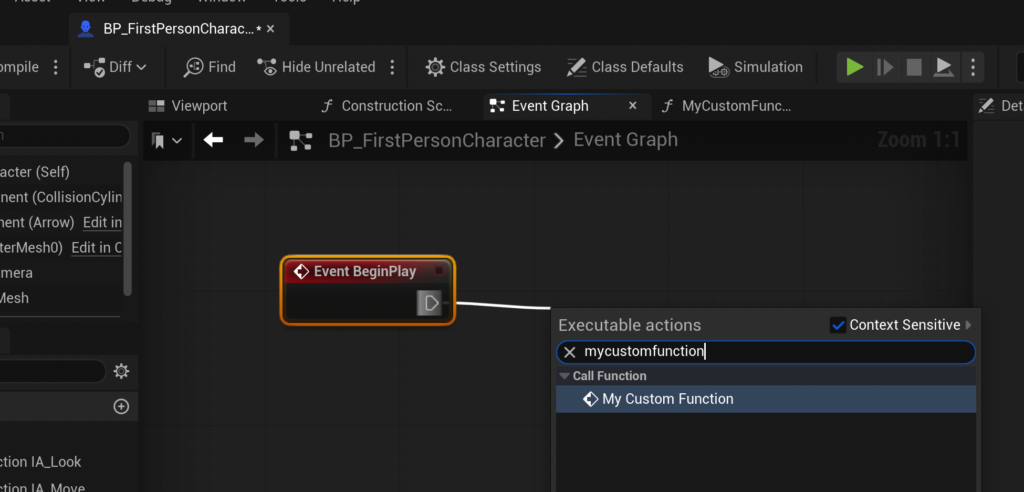
Now our MyCustomFunction is connected to our BeginPlay event. The last step is to press the Compile button and save our blueprint.
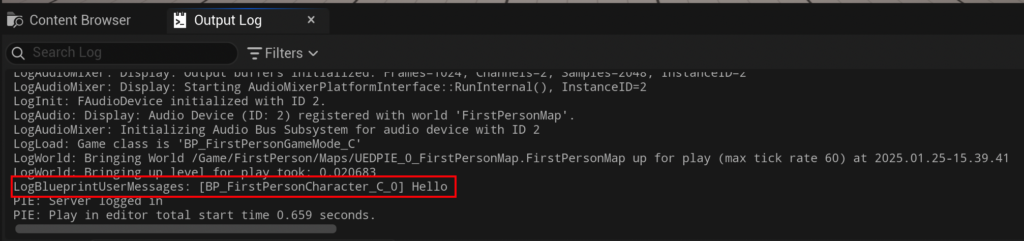
Clicking play now in our FirstPersonMap will print “hello” in our output log.
Adding more functionality
Now we have text printing on the screen! That’s great for testing but not very useful for gameplay. Lets add some more functionality to our blueprint function.
In this next example we are going to make the CalculateDamage function we talked about earlier!
This function will take in a number called “damage“, seeing how much “armor” our character has, then finally subtract the amount of “armor” from our “damage” number. In short we are calculating how much damage is dealt after our “armor” has absorbed some of the damage.
Notes on advanced functionality
Delay nodes are not supported in functions. If your blueprint needs delay nodes, consider using Custom Events. Click here to read our guide on How to use Custom Events in Unreal Engine.
Making the CalculateDamage function
To achieve this goal of our CalculateDamage function, first we need to input data into our function.
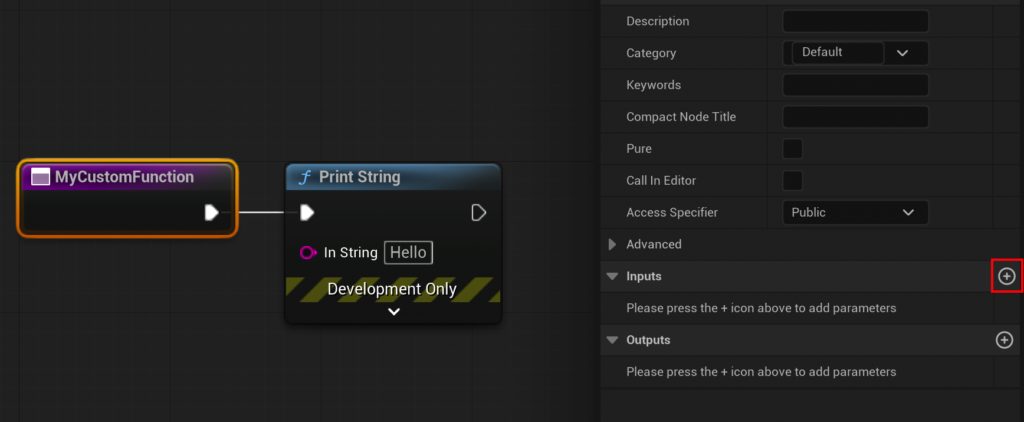
Firstly, click the purple “My Custom Event” node. You should now see in the details window on the right side of the editor sections for Input and Output.
As we are focussing on Input, click the small add button to add a new Input Variable.
We now see a new input parameter for our function.

In this example we want to pass in a number so we change the “Boolean” to “Float”.
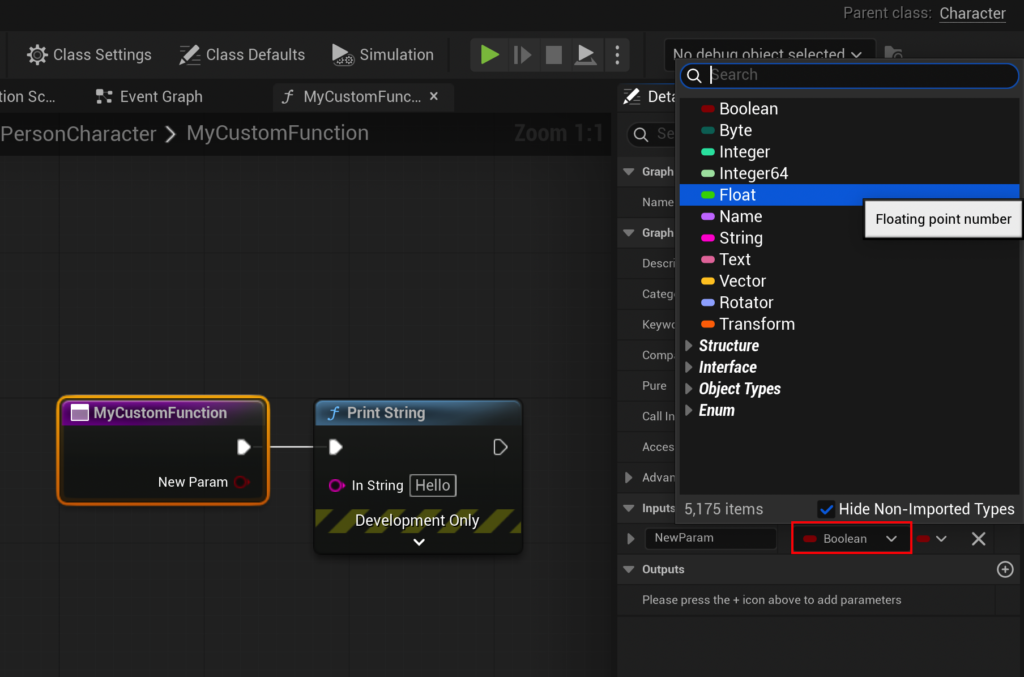
Next in the left text box give our new property a name. We are naming this “Damage”.
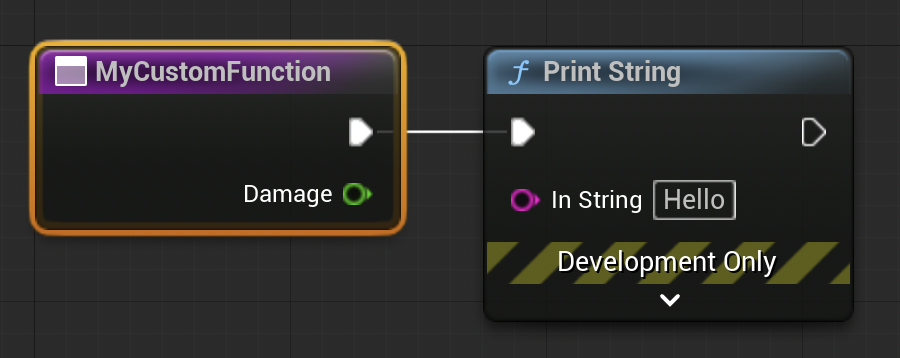
So far the function should look like this.
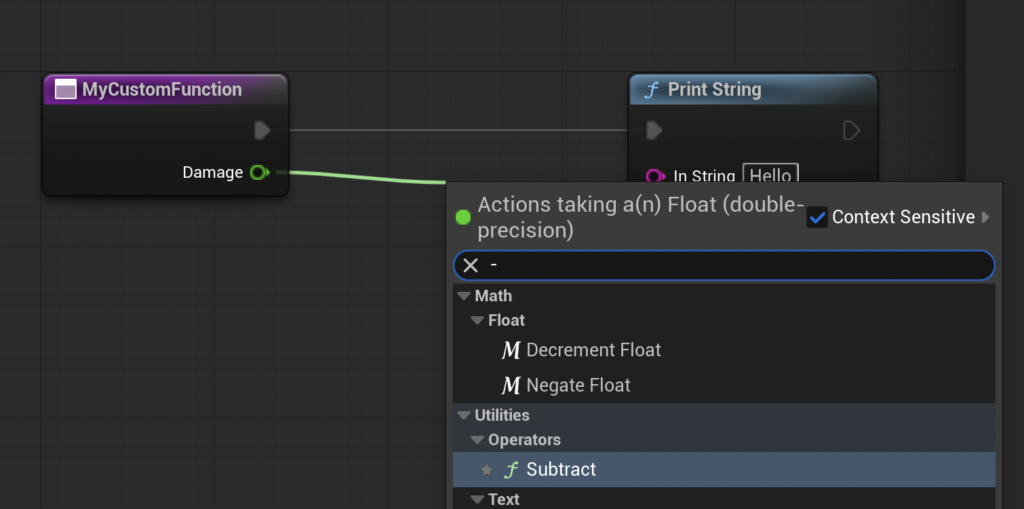
Now we are adding some other nodes to calculate our damage value.
To do this first, drag from the green Damage pin into the grid and let go of the mouse click. In the popup search “-” or “subtract” to find the subtract node.
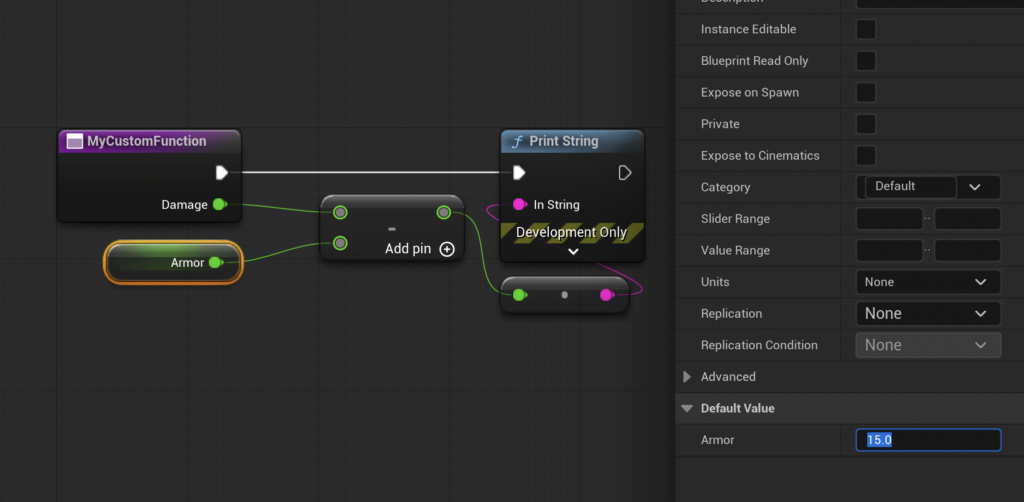
Next we click and drag from the bottom subtract node pin and let go, in the menu we then click “Promote to variable”. This will create a new variable that we name “Armor” to store our character’s armour number.
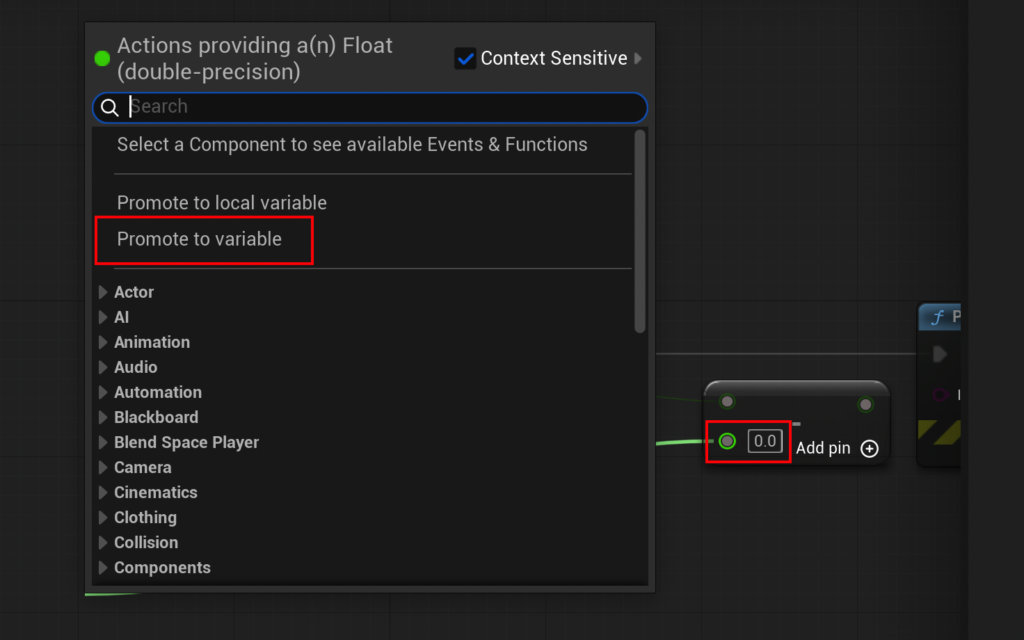
Next, click the new armor variable in the graph and on the right side details panel and set the armor value to any number you want. In this example we set armor to 15.
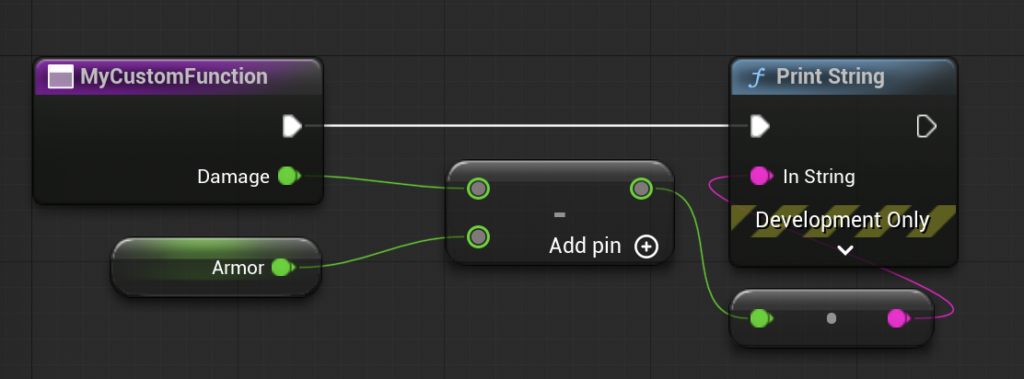
Our MyCustomFunction now takes in the Damage value and subtracts Armor from itself, this is then printed into the output log.
Returning our value
Our function now calculates values but does not send those values anywhere! We need to “return” this value out of our new function.
Returning a value is the word used to describe the output of our function. In Unreal Engine Blueprints we can have as many input and output values as we like.
First click our MyCustomFunction and look to the details panel on the right side of the editor again.
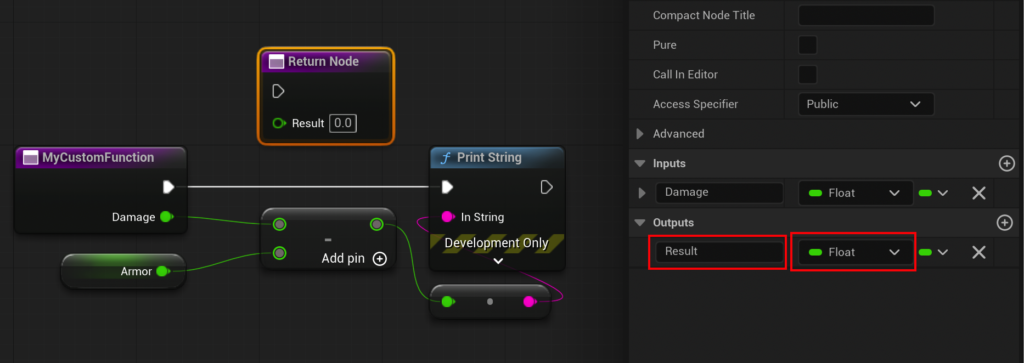
This time we are clicking the plus button on the Output section.

In the newly created Output result, change the type to Float and set the name to Result.

After creating the new output parameter a “Return Node” will be created automatically in the graph.
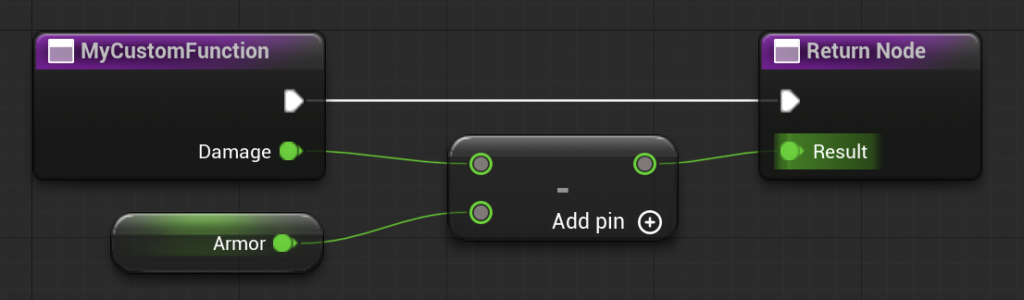
This Return Node result pin is where we can “return” our values out of the function.
We then delete the print string from the function as we no longer need it inside the function.
Our final function now looks like this.
In the event graph our function now looks like this. We can give it a “damage” value and get a “result” value out from the function!
To test this is working we set damage to 20.0 and connect our returned result value to a print string node.
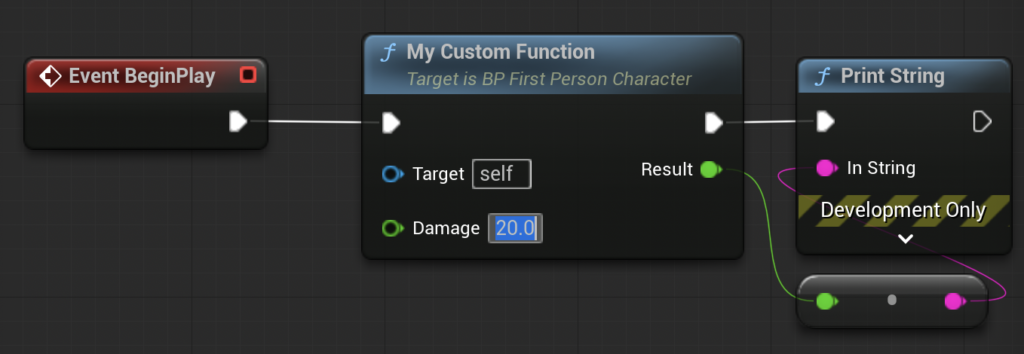
Demonstration
Finally, with our damage set to 20 and our armor set to 15, when we call our MyCustomFunction we get the value 5!
20 – 15 = 5
In the output you can see that our returned value of 5 is printed to the log!

Conclusion
You’ve now taken the first steps in getting started with Blueprint Functions in Unreal Engine 5! These essential aspects of programming allow you to separate logic into reusable nodes, cleaning up your blueprint actors and making your dream game easier to manage.
The basic concept and example covered in this guide provides a foundation to build upon. Whether you’re building gameplay mechanics, working on core technology, or cleaning up your existing code, Blueprint Functions are a fundamental aspect of Unreal Engine development.
Further Reading:
- Click here to read the official blueprint function unreal engine documentation
- Click here to watch Mathew Wadstein’s in depth blueprint function guide on YouTube (Not affiliated or associated with CouchLearn)
Leave a Reply