
The Session System in Unreal Engine 4 gives you access to many powerful online features such as the server browser, setting a maximum player limits, setting private and public slots and much more.
Using this system is very straightforward and only takes a few blueprint nodes to get working.
In this guide I will show you how to setup multiplayer in Unreal Engine 4 using the session system. We will setup a simple session and connect to it through another player.
Online and LAN Support
Unreal Engine’s default online subsystem can not find sessions outside of the local network the player is in.
To find and connect to sessions outside of your local network without a direct IP address connection you will need to use a different subsystem such as Steam.
Click here to read the documentation for the Steam subsystem
Starting a Multiplayer Session
Creating the Session
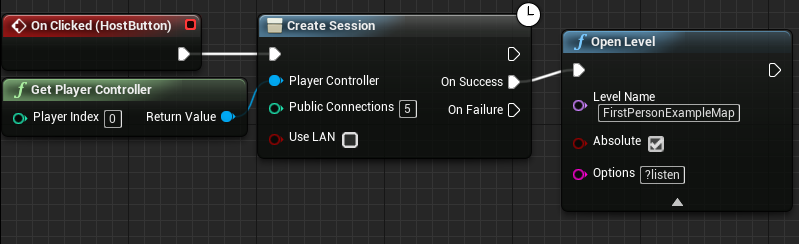
To start I created a simple widget with two buttons. One is host and one is play.
On the host button event use the create session blueprint node.
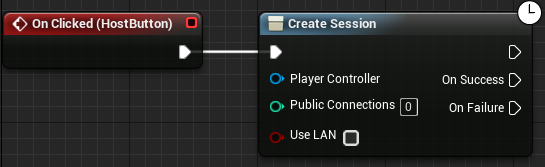
On the player controller pin, connect a “Get Player Controller” node and for the public connections pin set it to the maximum amount of players you want for this game.
Public connections is the maximum amount of players that can be connected to your server at once.
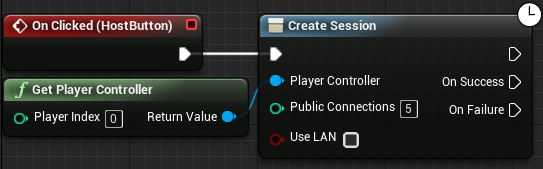
If “Use Lan” is checked the session you create will be only available on your local internet.
Opening Levels to Multiplayer
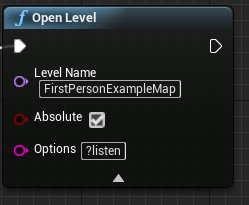
To create a multiplayer game using your level, add a new “Open Level” node and set the “Level Name” pin to the level you wish to play on. In my case this is FirstPersonExampleMap.
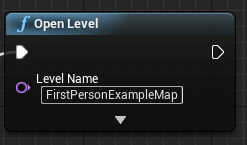
The important step is to click the triangle at the bottom of this node to expose the extra settings.

The “Absolute” checkbox and the “Options” text box pins are now visible. In the Options pin type exactly:
?listenThis code sets the level up to listen for multiplayer connections as a Listen Server.
With these steps complete, the code should look like this.
Connecting to your Multiplayer Session
Finding Sessions
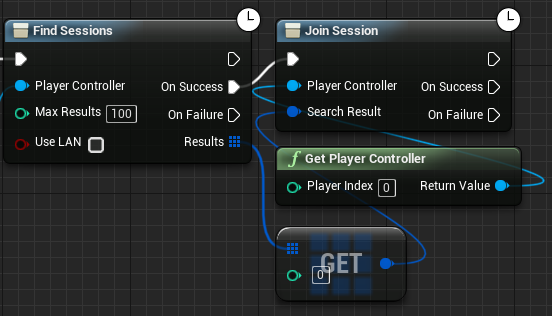
Finding sessions using blueprints is simple. The Find Sessions node handles all this for us. It outputs different execution pins based on if it succeeded or failed and the results that it found as an array.
If you aren’t familiar with arrays click here to learn about arrays in Unreal Engine 4.
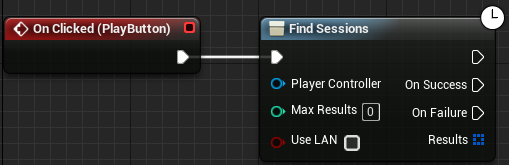
To start I created the Find Sessions node attached to the Play button in my widget.
On the player controller pin connect a “Get Player Controller” node and the Max Results pin is set to 100.
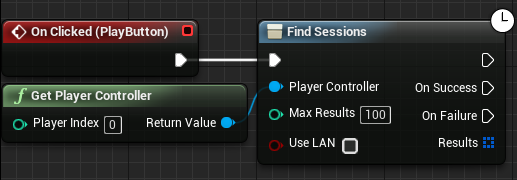
The Use Lan checkbox, if checked, will only search for sessions in your local area.
Joining the Session
To join a session in Unreal Engine 4, create a Join Session node.
This node requires the player’s controller and a session from the Find Sessions array in the previous step.
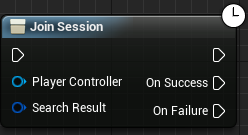
Firstly I will create a Get Player Controller node and attach it to the Join Session node.
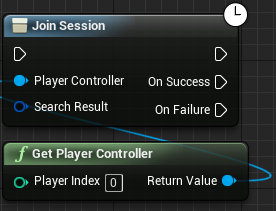
From the Results output pin of the Find Sessions node in the previous step I created a Get node. This will find the first session in the list.
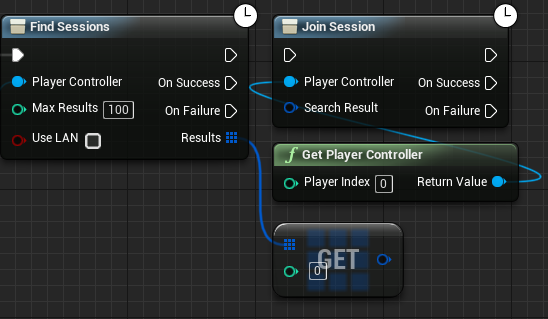
This is then attached to the Search Results input pin of the Join Session node.
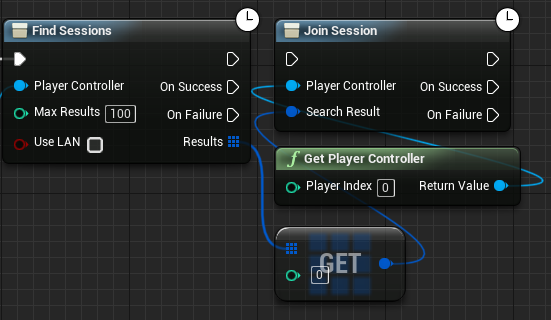
Finally, the Join Session node is attached to the On Success execution pin of the Find Sessions node.
Opening the Game Clients
In Unreal Engine 4, there is a drop down menu next to the play button which gives you access to multiplayer options.
On this menu make sure “New Editor Window (PIE)” is selected and the “Number of Players” slider is set to anything above 1.
Next, click the Advanced Settings button at the bottom of the menu.
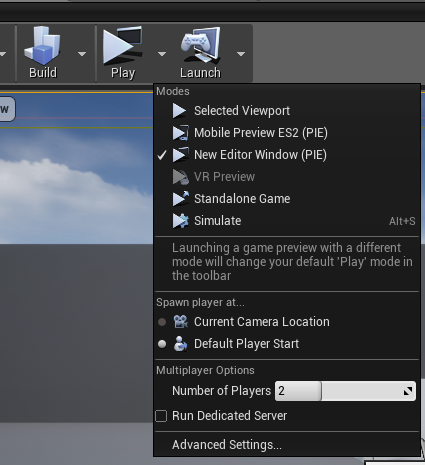
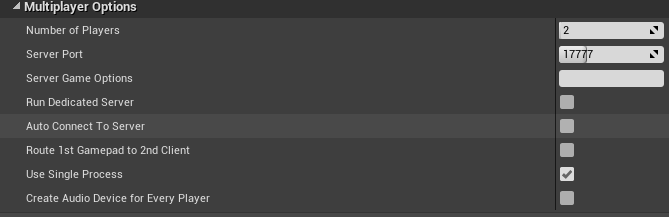
Near the bottom of the Advanced Settings menu, find the a section called Multiplayer Options.
Un-tick the checkbox “Auto Connect to Server”. This prevents the server auto connecting without the session system.
Finally, when you press the play button in your editor two clients will open.
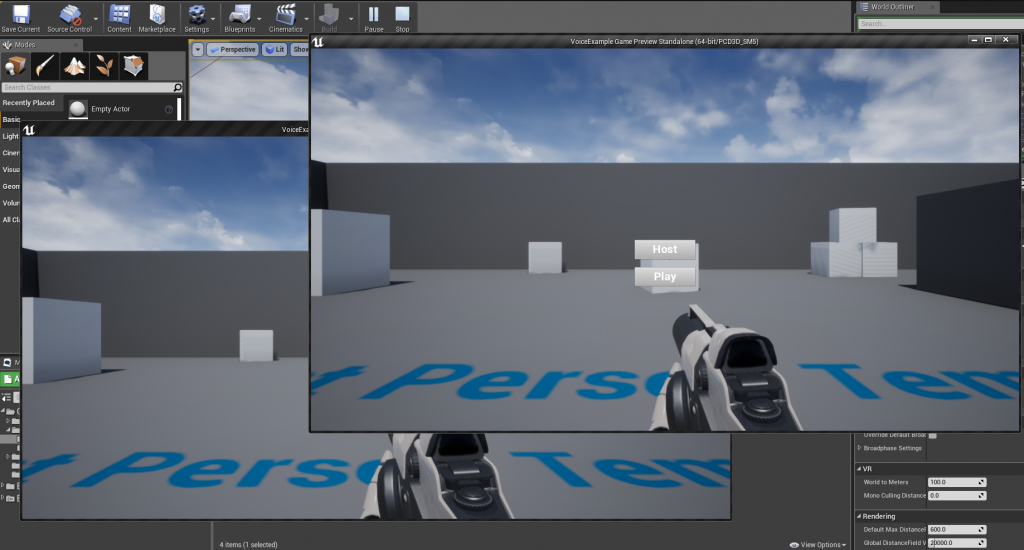
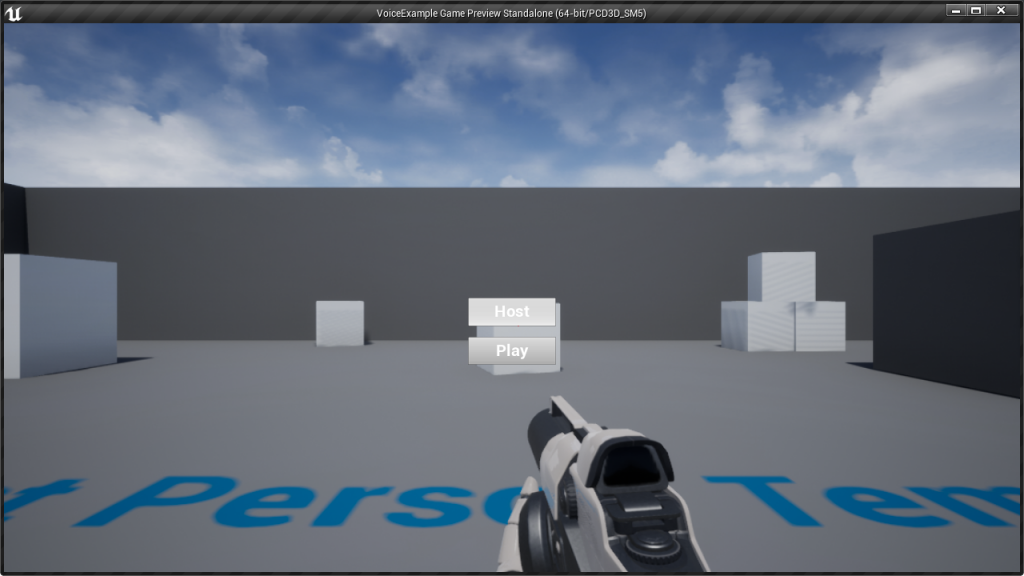
The custom widget discussed earlier, displays the Host button and Play buttons.
On the first client I pressed the Host button. This reloaded the level.
On the second client I pressed the Play button and waited until the Find Sessions node had finished searching for multiplayer sessions.
Once this finished it auto connected me into the first clients game.

Connecting to Sessions Outside your Local Internet Network
The session created in this guide will can be used in your local network and through the internet.
If you connecting to a session in your local internet, you do not have to do anything else.
If you wish to host your session to global internet users, make sure to port forward UDP/TCP 7777. Setting up port forwarding is different per router so check your specific router instructions.
If you don’t know what port forwarding is click here.
Download the Project Files
Conclusion
Your multiplayer session is created and players can join!
This guide only brushed over the multiplayer system to start with sessions in Unreal Engine 4.
To learn more about replication and the session system, the Unreal Engine documentation as it is a good place to start.
Click here to read more about Replication.
Click here to read more about the session system nodes.
Expanding the System
To challenge yourself, try create a widget that fills itself with the results of the Find Session nodes.
This, if done correctly, will create a server browser similar to the ones found in games such as Team Fortress 2, Counter Strike and many more.

These tutorials are awesome! Keep them coming!
Thanks! More tutorials are on the way.
Thanks a lot for these tutorials ! They helped me a lot
Thanks. I’ve been busy recently but more tutorials are on the way. If you have anything specific that you would like me to make a tutorial on let me know through the contact page.
Is there an tutorial for Connecting by Steam with an friend? with Blueprints?
and not with an advanced session plugin.
If you mean joining a specific friends session using the Steam overlay, the only way is to use C++ or the advanced session plugin.
The advanced sessions plugin is great and I do recommend it if you aren’t skilled with C++.
I hope this helped.
Can you explain how can we do this? using Advanced Session Plugin
To follow this tutorial using the advanced sessions plugin use the Find Sessions Advanced and Create Advanced Session nodes.
Yes, but how can we connect with a Steam server for example?
We are working on a Steam multiplayer guide at the moment but for now here is the official documentation for using the Steam online subsystem.
Our voice chat example projects are already set up to use Steam servers and can be found here: https://gumroad.com/couchlearn
https://docs.unrealengine.com/en-US/Programming/Online/Steam/index.html
how do I display the widget?
I would learn how to use widgets fully before attempting multiplayer as it helps to understand the engine before going onto this difficult topic.
Here is the link to the official documentation: https://docs.unrealengine.com/en-US/Engine/UMG/HowTo/CreatingWidgets/index.html
We have this tutorial ready setup to download on our store page here:
First Person: https://gumroad.com/couchlearn#EvfoJ
Third Person: https://gumroad.com/couchlearn#rump
Hi, I’m trying to set up a session and join it (I understand the basics of replication and have a few things implemented), but I’m having a few issues.
First, I noticed that the screenshot showing the multiplayer Advanced Settings shows a port of 17777 rather than 7777, so should we be forwarding whichever port we have in advanced settings? And, do we need to worry about setting the port in the DefaultEngine.ini at all? If so, where and what is the syntax for the setting to add there?
Secondly, when I create my session and open my level, the level opens but then 2 seconds later I crash and I’m getting this error:
TravelFailure: LoadMapFailure, Reason for Failure: ‘Failed to load package ‘/Game/Maps/ShootingRange/UEDPIE_1_ShootingRange”. Shutting down PIE.
I am opening my level with these options to load a certain game mode: ?game=/Game/Blueprints/Player/Blueprints/Deathmatch_GameMode.Deathmatch_GameMode_C?listen
I read elsewhere that testing sessions in PIE is usually not a good idea because it has its issues, but even if I launch in standalone, when I create the session and load the map, I get kicked back to my game’s main menu (rather than crashing) and no errors are shown when running in standalone. Any idea what could be wrong?
Sorry for the delay. This comment wen’t into the auto spam for some reason. I don’t think you can load a level like this for a multiplayer session. The client may be loading a different game mode causing this crash. Loading a level with the level name and ?listen should work fine as I have tested this with many previous projects using NULL and the STEAM subsystems. The port will be 7777 as default unless setup to be different in the config.
I hope this helps!
I think my comment from earlier was deleted, what gives? I’m running into a few issues with getting this to work and hoping to get some help.
Sorry! My previous comment suddenly showed up when I posted this one. Must have been some kind of caching!
Hi, I bought your multiplayer internet but I feel a little cheated…
I see that the code is the same that any local multiplayer setup, even in DefaultEngine.ini don’t be any information about “outside ip”.
The only “not default” content are two widtes and the menu map who only create that widgets. The widgets itself only call the Create, Find and Join nodes, without any change respect the above screenshots.
And this three things for £12.08 (with IVA)…
How this works exactly? how the client know where to find the server when I use a the FindSession without LAN option checked? It searchs over ALL internet world until find the server? I don’t understand 🙁
Opening port 7777 UDP in the computer it’s enought? But how the client found it?
Thanks
I’m sorry to hear that you feel cheated. The session browser is mainly for users who want to extend their project to Steam or other online subsystems. I have updated the descriptions on our store to reflect this more clearly.
I have edited both multiplayer projects now to include a direct connect to IP section. You will receive an email for the updated project files. I have also emailed you the first person multiplayer project to compensate you for the inconvenience.
Kind regards,
Matt from CouchLearn
Thank so much Matt, I received your email and checked the project and now I can found a solution to a direct IP connection.
Thanks for the effort, I feel better now 🙂
Hello,
I used your tutorial to create and join multiplayer session which works fine when on a local network. What I don’t understand is how this will work outside local internet? I have port forwarded 7777 UDP on my router and set up static IP for my server machine but still when I join client from another network, it doesn’t join it.. Kindly help and share more information to solve this problem.
Thanks
My mistake, I forgot to add to the guide that you need to port forward UDP 7777 and TCP 7777. I have adjusted the guide for this information.
Let me know if this works 🙂
Hi Matt,
It still doesn’t work and I don’t understand how one can find the session over the internet without mentioning the IP address. It connects from different machines which are on the same network but coming from different network doesn’t connect. May be you should explain clearly how the networking will work when someone joins from another network using IP address.
Thanks.
The sessions system is really designed use with other online subsystems.
At the time of writing this guide I presumed developers looking for this information would already be using the Steam online subsystem or other subsystem included in Unreal Engine 4.
If you are using the NULL subsystem the sessions system will not find the other servers unless they are in the same local network.
I will update the guide to make this clear.
Here is the link to the Steam subsystem Unreal Engine documentation: https://docs.unrealengine.com/en-US/Programming/Online/Steam/index.html
While this works fairly nicely, it’s also worth pointing out that by default the input gain for VOIP is set to -10.0f but seems to be parsed as +10.0f.
So if you’re going through these tutorials and find that the voice is peaking horrendously as if your headphones are about to explode – this is why.
Set it to something like 1.0 instead via the console/ExecuteConsoleCommand – “voice.MicInputGain 1.0”. And then your voice should be crisp and clear albeit maybe a bit quiet.
I do agree with this. I came to this conclusion however by trying multiple different values. The -10 works well with every project that I have used this system in with a variety of player microphones. Some microphones do clip but adjusting the VOIP audio class and individual VOIPTalker volumes can mitigate this. Hopefully in future engine versions we can get simpler BP exposed controls for VOIPTalker.