
Saving and loading of game data is a essential part of every modern game. Luckily for you, Unreal Engine has a built in SaveGame system that allows easy saving and loading of your game data to a file. All data saved to this file can be loaded easily with only a few functions!
In this guide you will learn how to Save and Load in Unreal Engine 5.
Prerequisites
To follow this guide you need to understand the basics of Unreal Engine, working with blueprints inside the editor and using a custom Game Instance. We have linked guides below to these topics.
The basics of blueprint actors.
Adding variables to blueprint actors.
How to use custom Game Instances.
Custom Events in Unreal Engine.
It would also be beneficial to understand how Input Actions work in Unreal Engine:
Click here to learn how to use input actions and axis.
How it Works
SaveGame is a class in Unreal Engine that is preconfigured to save and load the data contained in the variables you add.
The variables you set are then saved to a file stored on the user’s machine. This is then read and the variables can be accessed in your game.
The save file is located in these locations:
Windows: Local Appdata folder
MacOS: Library/Application Support
Linux: /home/username/.local/share
Almost every variable type can be saved and loaded using the SaveGame class.
Creating our Save Class
Firstly, create a new blueprint class from the content drawer.
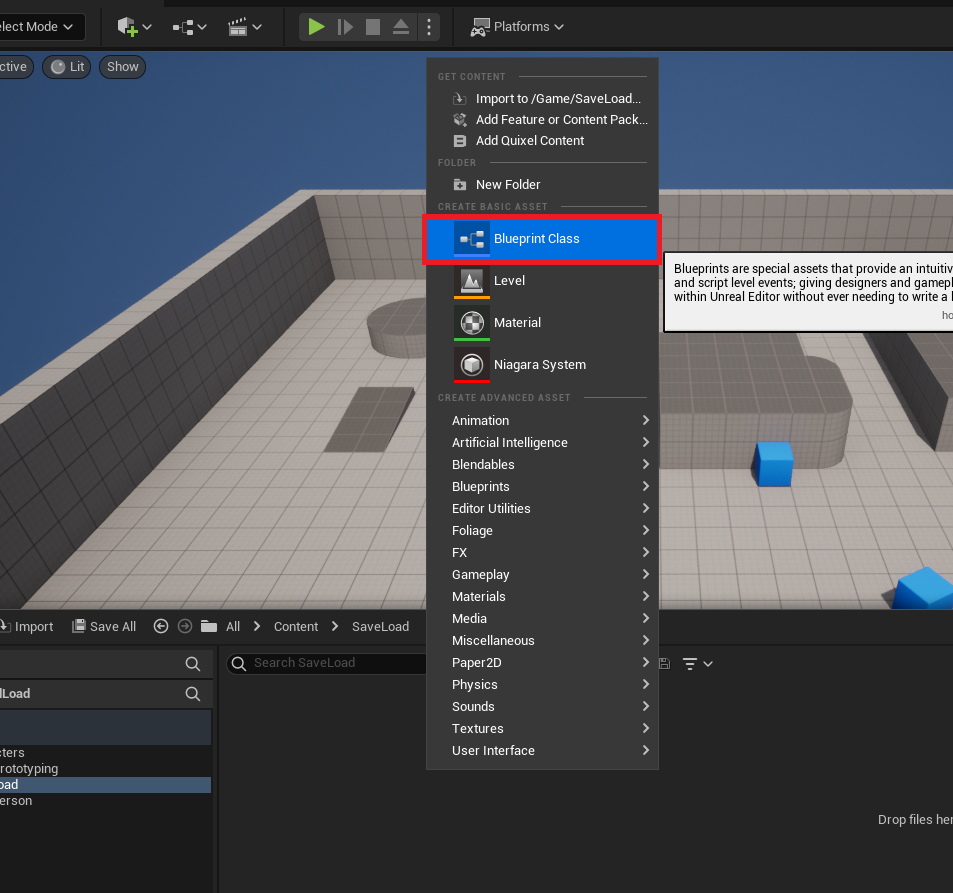
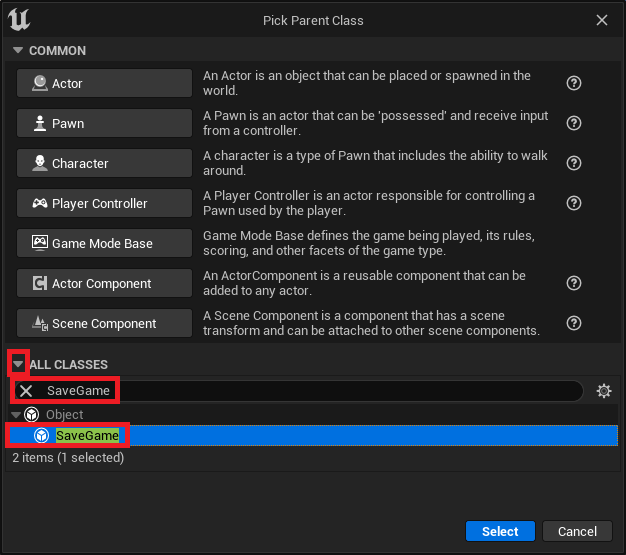
Next, in the popup window, click the drop down arrow at the bottom. In the search bar type “SaveGame” and click the option from the list.
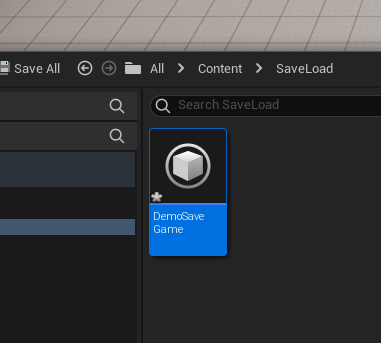
Then, give your new SaveGame blueprint a suitable name. We need to remember this as it is used later. In our case, we used the name DemoSaveGame.
Saving the variables
Now that your SaveGame class has been created, you can add any variables you need for your project.
For this demo we create a new Vector variable called “PlayerPosition”.
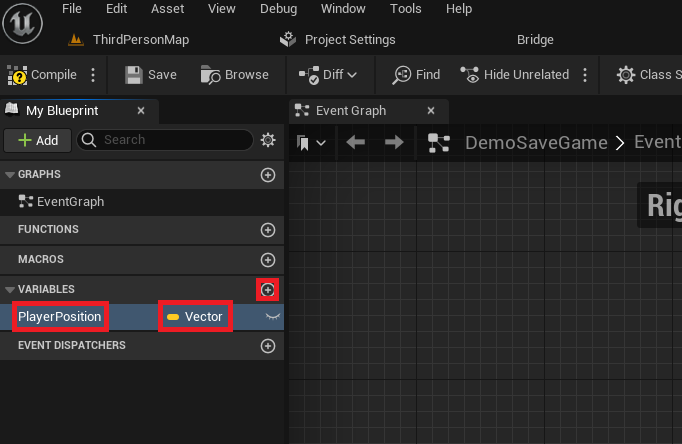
Once you have created the variables you need for your project, click Compile and Save to ensure your changes are applied and saved.

Adding Save and Load Functionality
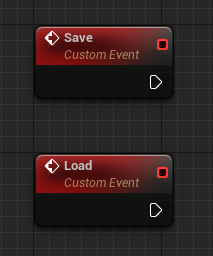
Firstly, in our Game Instance, add two new custom events. “Save” and “Load”.
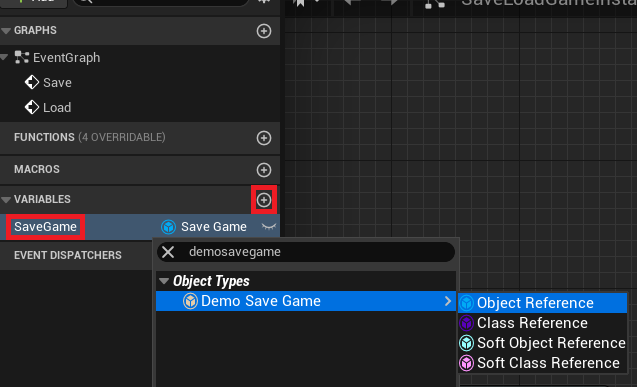
We also need to add a new variable on the Game Instance. Name this variable SaveGame and set the type to the class you created in the previous step.
Loading our Variables from the Save File
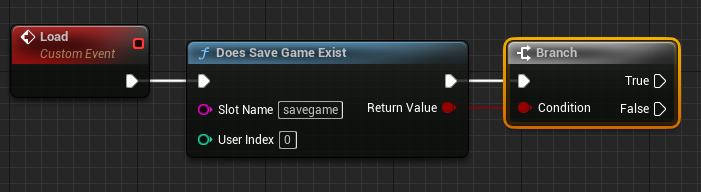
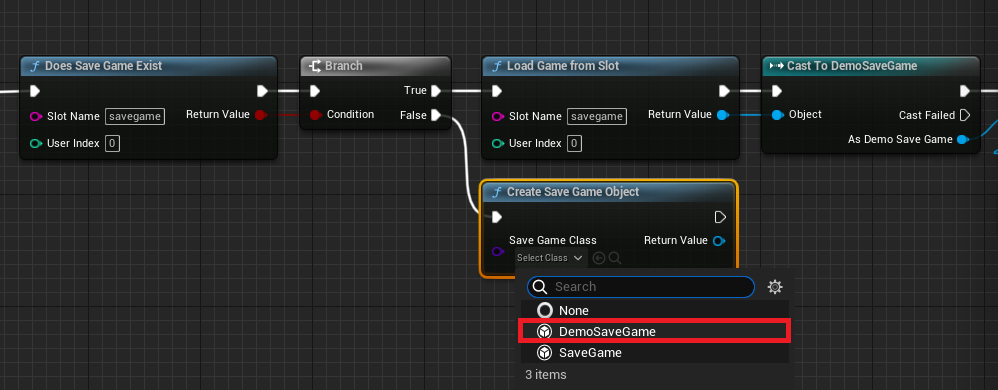
Now that our Game Instance is setup, on the Load event, create a new “Does Save Game Exist” node. The “Slot Name” pin needs to be given a name. This can be set to anything you want. Each different name you use saves to a different file.
In our case we just named this “savegame”.

Next, add a branch to the output pin of the “Does Save Game Exist” node. This will branch if our save file exists or not.
If the Save File Exists
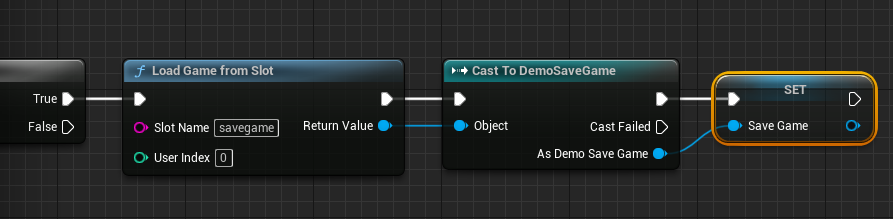
From the “True” pin, create a new “Load Game From Slot” node with the same “Slot Name” as before.

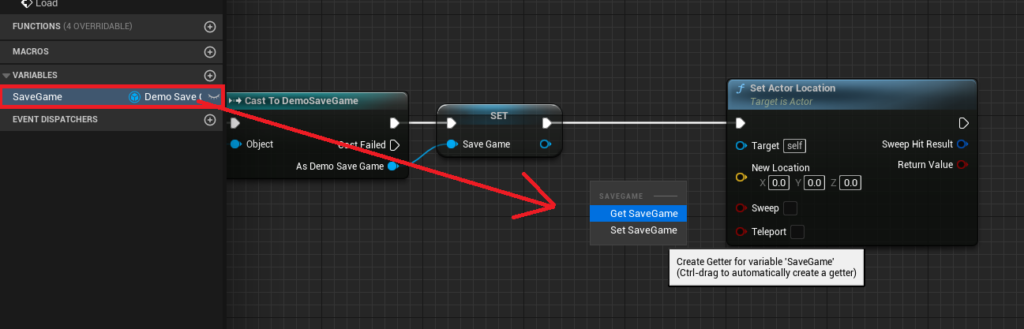
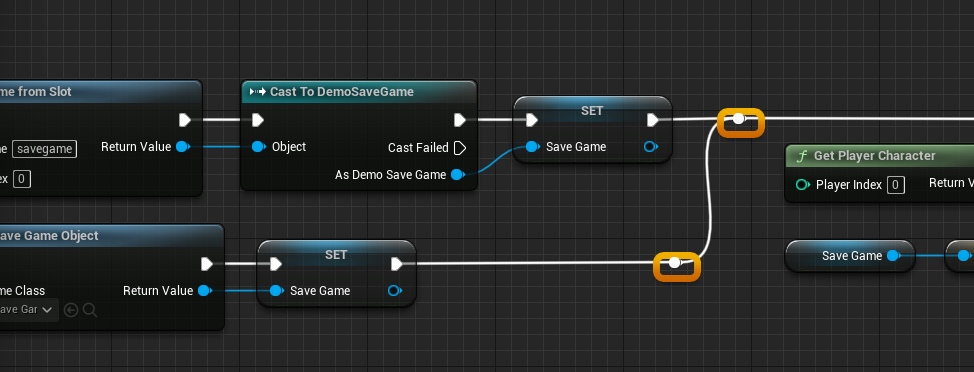
Next, from the blue output pin, create a “Cast to” node. This should cast to the class you created in the first step. For us this is “Cast to DemoSaveGame”.

Then set the Game Instance’s Save Game variable we created earlier to the output of the “Cast to” node.
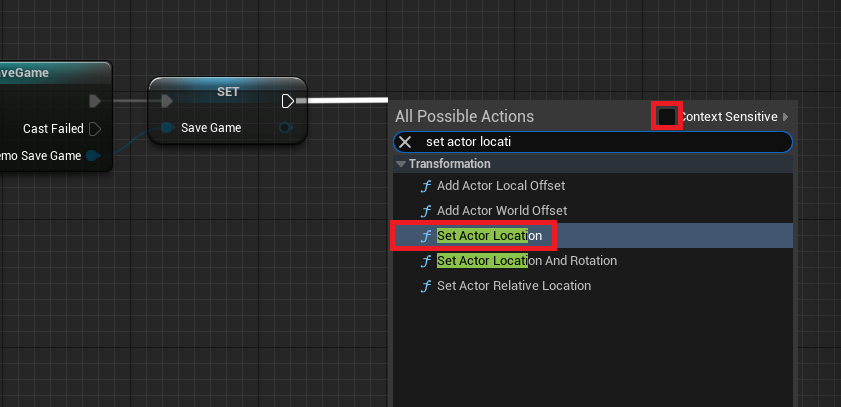
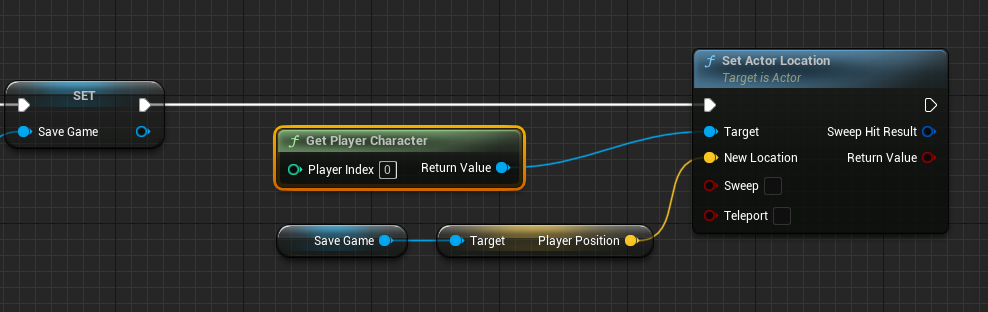
From there, we create a “Set Actor Location” node. This will be used to move our character to the saved location.
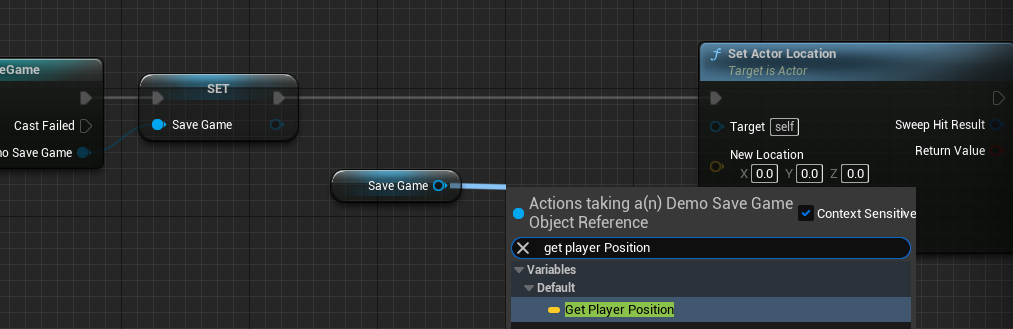
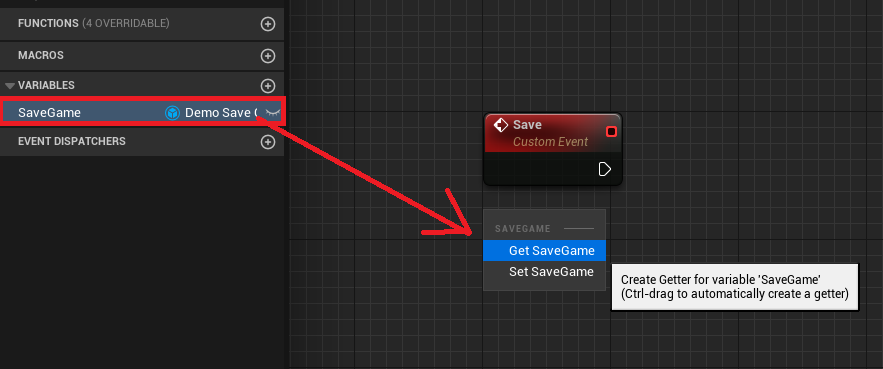
From the variables list on the left of the editor, drag the “SaveGame” variable and drop near the the nodes. This will show a list of options. Click the “Get SaveGame” option to allow us easy access to this variable for the next few steps.
Dragging from the “Save Game” blue pin then typing “get player position”, we can see our “Player Position” Vector variable that we created earlier. Click this option in the list to add it to the blueprint graph.
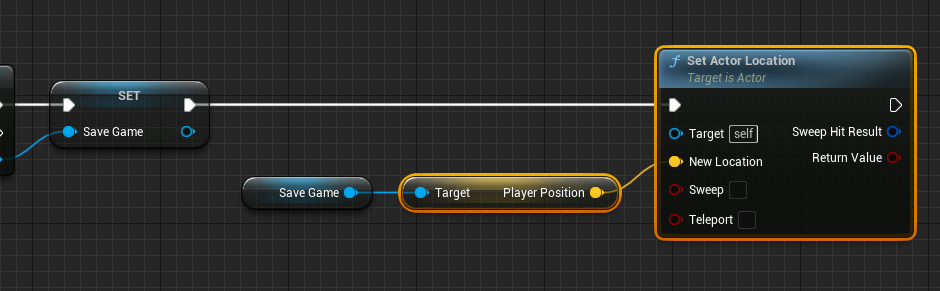
Next, connect the “Player Position” vector pin to the “New Location” option on the “Set Actor Location” node.
Lastly, create a “Get Player Character” node and connect this to the “Target” pin of the “Set Actor Location” node. This now gets our saved player position and moves the player character to it.
If the Save File doesn’t Exist
If the save file does not exist then we need to create a new file. From the “False” pin create a new “Create Save Game Object” node. Then set the “Save Game Class” purple pin to the custom SaveGame class we created earlier.
Then, set the Game Instance “Save Game” variable to the blue output pin value.
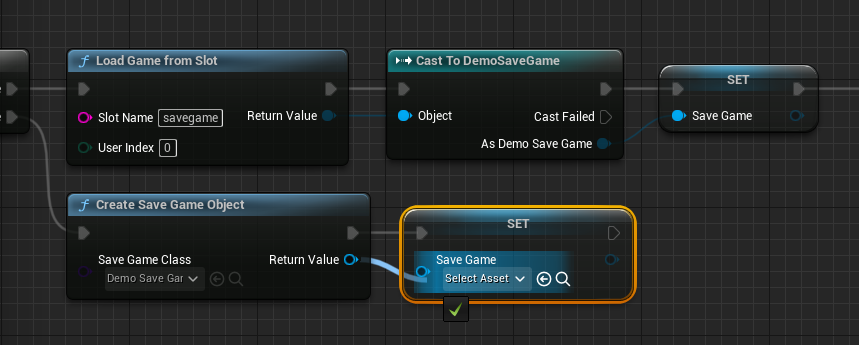
Lastly, connect the “Set Save Game” node to the blueprint nodes above. This can be done by double clicking the white lines to create points.
Connect the blueprints nodes together as shown in the image below.
Saving our Variables to the Save File
Now that we can load saved variables, we need to save the variables!
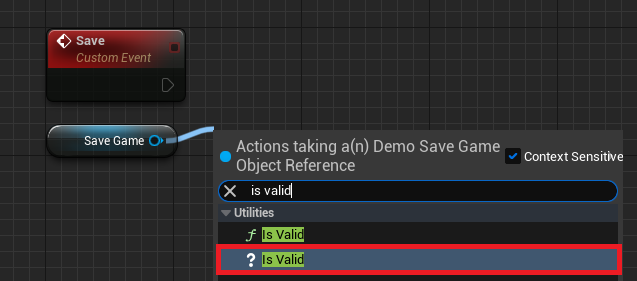
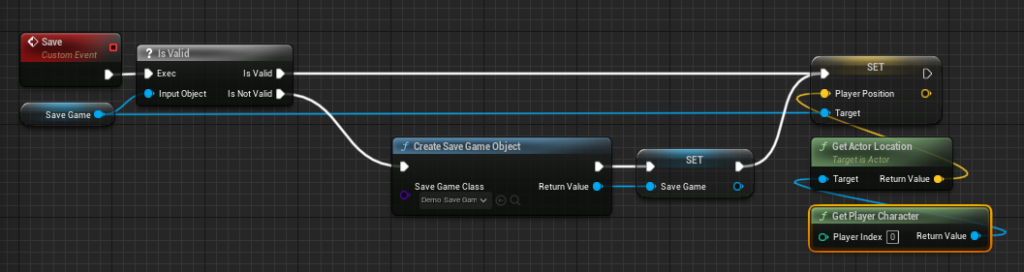
Firstly, drag and drop the SaveGame variable and click “Get SaveGame” next to the Save event.
From there, we create an “? Is Valid” node. This allows us to branch the code if our save file has been loaded or not.
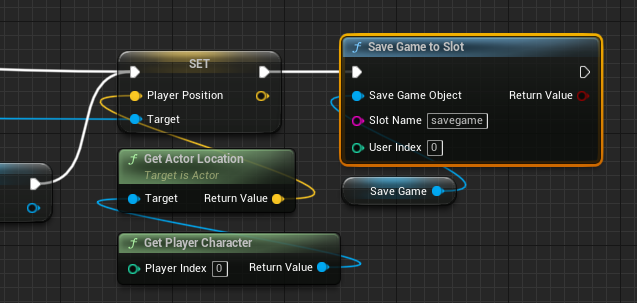
If the Save File is Valid
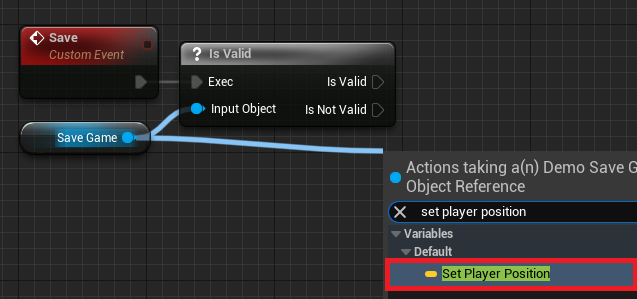
From our “Save Game” blue variable, create a “Set Player Position” node and connect it to the “Is Valid” pin.
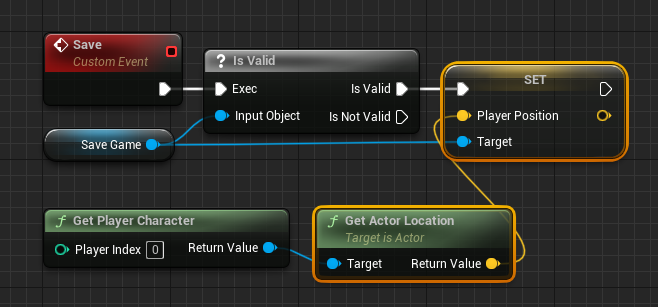
Next, create a “Get Player Character” node and from the blue output pin, create a “Get Actor Location” pin.

Lastly, connect the yellow output pin of the “Get Actor Location” node to the yellow input pin on the “Set Player Position” node. Now if our save game object is valid we will save the player character location to the save file on disk.
If the Save File is not Valid
If the save game object isn’t valid, we need to create it before saving any data.
Firstly, create a “Create Save Game Object” node, set the purple input value to our previously created save game class, then connect this to the “Is Not Valid” pin as shown below.
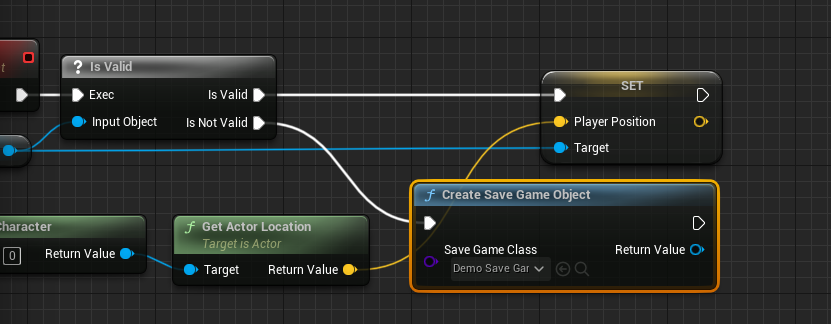
Next, set the Game Instance SaveGame variable to the blue output pin of the “Create Save Game Object” node.
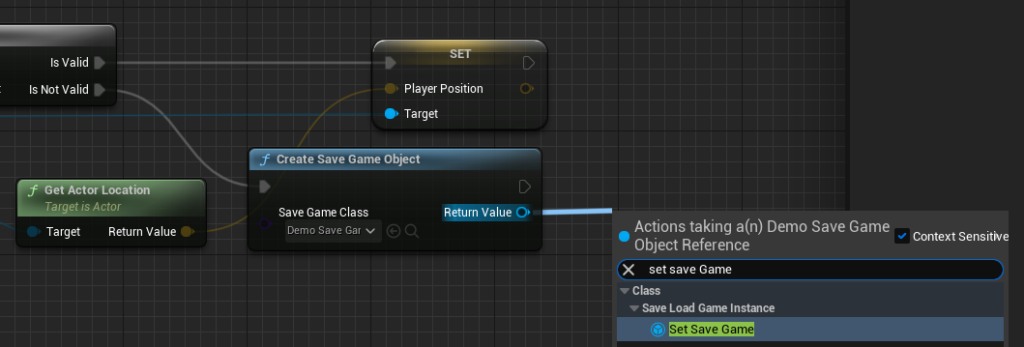
Then, connect the “Set Save Game” node to the “Set Player Position” node as shown below. This will save the player character’s position after the “Save Game” object is valid.
Finally, create either a “Save Game to Slot” or “Async Save Game to Slot” node from the blue SaveGame variable.
If your game needs to save lots of information, use the “Async Save Game to Slot” node.
If your game only saves a small amount of data, use the “Save Game to Slot” node.
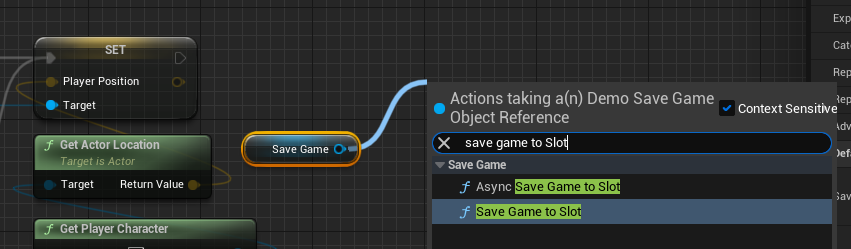
Make sure to set the “Slot Name” variable to the name you used earlier. In our case this was “savegame”.
Saving and Loading the Player Position
Now that your Save and Load system is complete, we need to trigger this functionality.
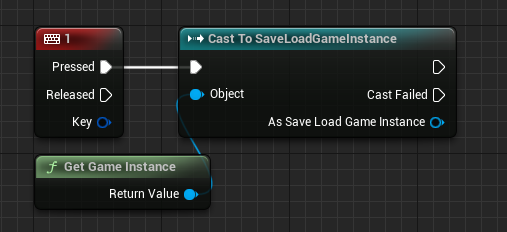
In your Player Character class add an Key Press Event. For this guide we used the number 1 key from our ThirdPersonCharacterBP class.
From there, create a “Get Game Instance” node and a “Cast To” node to your custom game instance. Connect the two as shown below.
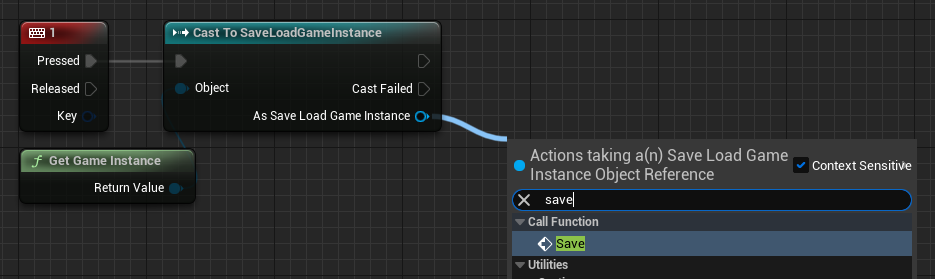
Next, from the blue “As Game Instance” pin, call the “Save” event we created earlier. Now when we press the number 1 key, our game will save the current player character’s position to the save file.
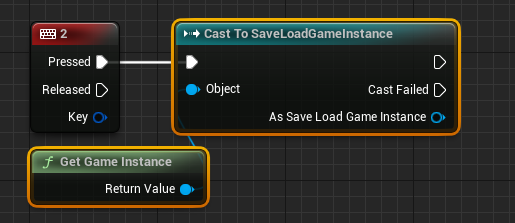
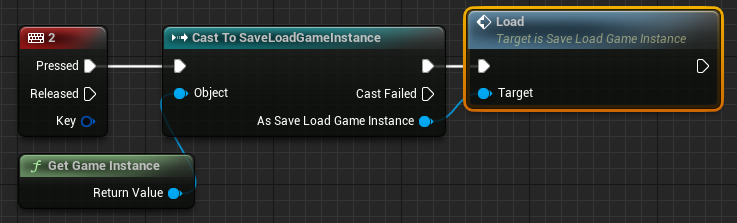
Repeat the previous step for the number 2 key as shown in the image below.
Finally, call the “Load” event from the “As Game Instance” blue pin. This will now load our saved player position from the save file and teleport our player to that position.
Demo
Download the Project Files
Conclusion
Now your project has saving and loading capabilities!
This is a very basic implementation but allows you to expand this further. Any data you want to save and load can be implemented into the events we created during this guide.
An example of this would be the player’s health. This variable could be created on the SaveGame, saved and loaded onto the character with minimal setup.
Further Reading:
Official UE4/5 documentation for the Saving and Loading in the engine.
Tom Looman’s great guide for implementing Saving and Loading for C++ classes
In case I want to use a Structure with variables inside it to link to the ThirdPersonCharacter, how is this accomplished?