Unreal Engine 5 brings Nanite, the virtualized geometry system. Nanite allows all Unreal Engine 5 projects to have large amounts of detailed meshes on the screen with great performance. Draw calls and poly count concerns are a thing of the past!
Nanite also has automatic level of detail for all meshes which improves performance on a range of different devices!
In this guide we will be showing you how to enable Nanite support on your meshes in the editor.
Enabling Nanite on your Meshes
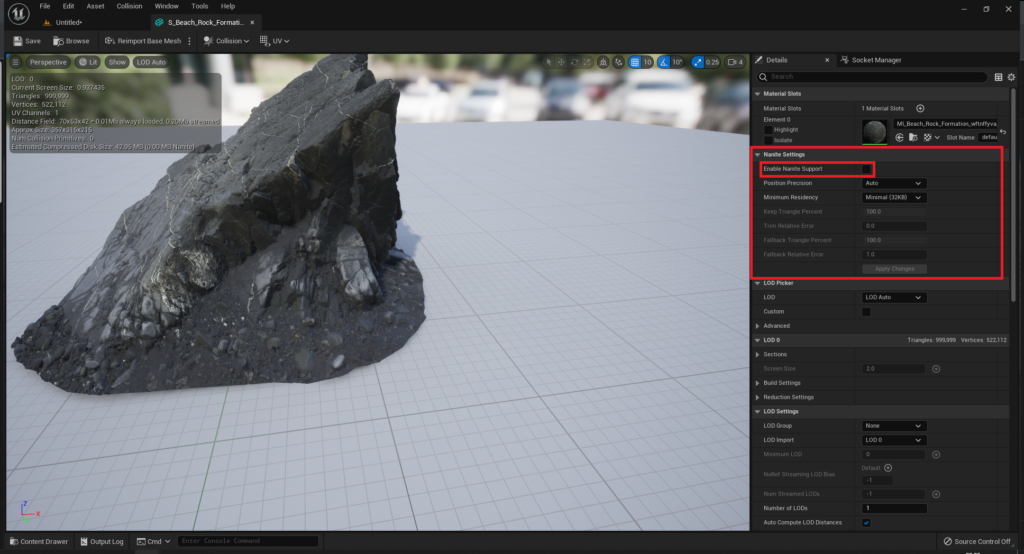
First, open your mesh in the editor. As you can see in the image below, this Megascans mesh has 1 million triangles!
Click here to read our guide on using free Quixel Megascans assets in Unreal Engine 5

Next, on the right side of the editor you can see the details panel. In the “Nanite Settings” section you should see all of the settings related to Nanite functionality for this mesh.

From there, to enable Nanite for this mesh, tick the “Enable Nanite Support” box and click the “Apply Changes” button.
For most meshes you can leave the settings at their default values.

Lastly, after applying the changes we can see “Triangles: 999,999” has changes to “Nanite Triangles: 999,999”.
This means our mesh now is handled and rendered by Nanite!

Comparison
Finally, we will compare the same scene with Nanite disabled and with Nanite enabled.
The first image below shows hundreds of rock meshes before nanite was enabled. The framerate stayed between 6 and 9 frames per second. Having many meshes on screen at once without Nanite makes the game unplayable.

Now we are getting over 80 frames per second! Our project is no longer limited by how many triangles we have in our detailed meshes.

Conclusion
Your meshes are now setup and are now rendered using Nanite!
From our results you can clearly see huge performance improvements with all of your meshes by following these easy steps.
To learn more about Nanite we recommend these links to official Unreal Engine 5 resources.
Nanite Overview: https://docs.unrealengine.com/5.0/en-US/nanite-virtualized-geometry-in-unreal-engine/
Nanite demonstration video: https://www.youtube.com/watch?v=xUUSsXswyZM
Leave a Reply